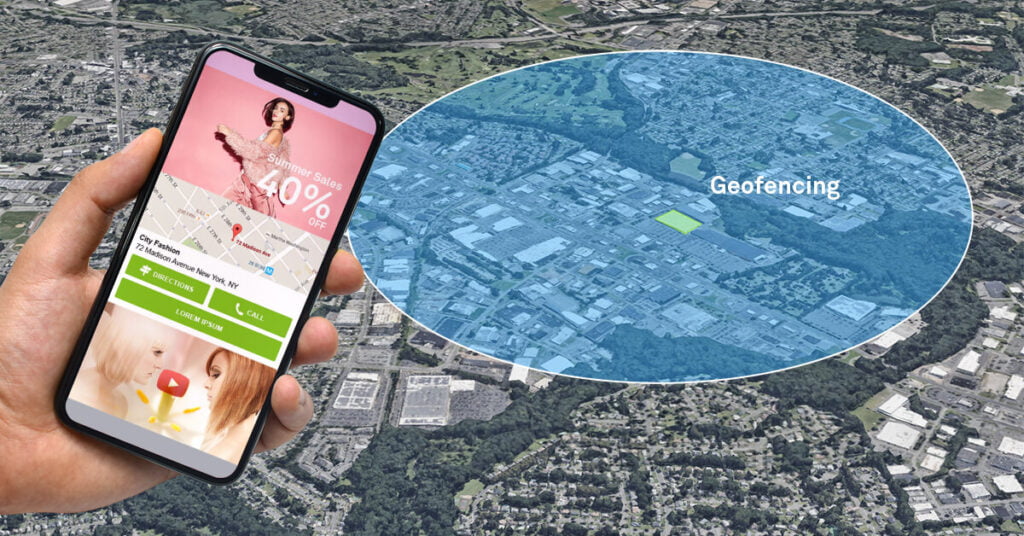
How to Set Up Geofencing: Master The Art of Location Targeting
To set up geofencing, you need to define a virtual boundary using GPS or RFID technology and designate the actions that should be triggered when someone enters or exits the boundary. Geofencing is a location-based marketing tool that allows businesses to target their audience more effectively by delivering relevant content or notifications to users within a specific geographic area. By leveraging geofencing technology, businesses can increase customer engagement and boost sales by providing personalized experiences and timely offers based on their location. We will explore the process of setting up geofencing and discuss its benefits for businesses. The Basics Of Geofencing Geofencing is a powerful marketing tool that enables businesses to target specific geographic areas and deliver personalized messages to potential customers. It uses a combination of GPS, Wi-Fi, and cellular data to establish virtual boundaries, or “fences,” around defined locations. When a user enters or exits these boundaries, actions such as sending notifications, displaying ads, or triggering specific app features can be automatically triggered. In this blog post, we will delve into the concept of geofencing, its applications, and the benefits of harnessing its power for your business. Understanding The Concept Of Geofencing And Its Applications Geofencing is a location-based technology that offers businesses the ability to target customers based on their physical whereabouts. By setting up virtual perimeters, businesses can create personalized and contextually relevant experiences for their users. Let’s take a closer look at how geofencing can be utilized: Applications 1. Retail: Geofencing can be used to send push notifications or discounts to potential customers when they are near a brick-and-mortar store. 2. Events: Geofencing can be used to provide real-time updates, maps, or promotions during conferences, music festivals, or other large-scale events. 3. Travel and Hospitality: Geofencing can be utilized to send personalized recommendations or offers to tourists based on their location. Exploring The Benefits And Significance Of Location Targeting Location targeting through geofencing offers numerous benefits and significant advantages for businesses: Precise Targeting: Geofencing allows businesses to target customers within a specific radius, ensuring their marketing efforts are focused on the most relevant audience. Improved Engagement: By delivering personalized messages based on a user’s location, businesses can capture attention and create more engaging experiences. Increased Conversion Rates: Sending contextually relevant offers or notifications to users when they are near a particular store or event can significantly increase the likelihood of conversion. Enhanced Customer Experience: Geofencing enables businesses to provide valuable information, such as directions, event updates, or exclusive offers, to enhance the overall customer experience. Competitive Advantage: Businesses that effectively implement geofencing strategies can gain a competitive edge by delivering tailored experiences that resonate with their target audience. By understanding the basics of geofencing, its applications, and the benefits of location targeting, you can unlock a powerful tool to engage with your customers in a personalized and contextually relevant way. Stay tuned for our next blog post where we will guide you through the process of setting up geofencing for your business. Credit: www.insivia.com Choosing The Right Geofencing Platform Setting up geofencing for your business is a strategic move that can help you target specific audiences and drive engagement. However, choosing the right geofencing platform can be a daunting task. With so many options available, it’s important to consider several factors before making your decision. In this article, we will explore these factors and guide you through the process of selecting the ideal geofencing platform for your needs. Factors To Consider When Selecting A Geofencing Platform Before diving into the features and affordability of various geofencing platforms, it’s essential to understand the key factors that should influence your decision. By keeping these in mind, you can narrow down your options and find the platform that aligns with your business goals: Accuracy and Reliability: One of the crucial factors to consider when choosing a geofencing platform is its accuracy and reliability. Make sure the platform you select offers precise location targeting and can deliver consistently reliable results. This will ensure that your geofencing campaigns are effective and provide a positive user experience to your target audience. Customization and Flexibility: Every business has unique requirements when it comes to geofencing. Look for a platform that allows you to customize your geofences based on your specific needs. The ability to set up different-sized geofences and tailor your notifications will enable you to create personalized and engaging experiences for your customers. Data Collection and Analytics: The geofencing platform you choose should offer robust data collection and analytics capabilities. It should provide comprehensive insights into user behavior within your geofences, allowing you to refine your marketing strategies and make data-driven decisions. Look for platforms that offer detailed reports on footfall traffic, dwell time, and other relevant metrics. Integration and Compatibility: Consider the platform’s compatibility with your existing systems and technologies. Look for a geofencing solution that seamlessly integrates with your CRM, advertising platforms, and other marketing tools. This will streamline your operations and enable you to leverage your existing infrastructure effectively. Scalability: As your business grows, your geofencing needs may evolve. Therefore, it’s essential to choose a platform that can scale according to your requirements. Look for a solution that can handle a growing number of geofences, users, and notifications without compromising performance. Comparing Different Platforms Based On Features And Affordability Now that you understand the key factors to consider, it’s time to compare different geofencing platforms based on their features and affordability. Here’s a table summarizing some popular platforms: Geofencing Platform Features Affordability Platform A Advanced customization options, real-time analytics, seamless integration Affordable pricing plans for businesses of all sizes Platform B User-friendly interface, comprehensive reporting, scalable infrastructure Competitive pricing with flexible subscription plans Platform C Robust data collection, AI-powered targeting, multi-channel notifications Value-for-money pricing with customizable packages Remember to evaluate each platform based on your specific requirements and budget. Consider the features offered, the level of customization available, and the pricing plans that align with your business goals. By carefully analyzing these factors, you can select the
How to Set Up Geofencing: Master The Art of Location Targeting Read More »